
A Solution Deployment Plan describes how a system’s components will be implemented and updated throughout the lifecycle. Within Dynamics 365 for Sales solutions are how customizers and developers‘ author, package, and maintain units of software that extend Microsoft Dynamics 365. Customizers and developers distribute solutions so that organizations can use Microsoft Dynamics 365 to install and uninstall the business functionality defined by the solution.
A Microsoft Dynamics 365 solution is a compressed (.zip) file that contains multiple customized components that have been exported from a Microsoft Dynamics 365 instance, so that they may be transported and imported into another instance. However, a solution file is a single binary file that does not lend itself to source code control or team development.
Note: There is no way for multiple developers to work on the same custom components in the same solution.
Therefore, team development of Microsoft Dynamics 365 for Sales (D365s) solutions requires those actively working on a common solution to be aware of the work of others. Any project resource customizing Dynamics 365 for Sales or for Operations will follow the client organization’s D365 Development standards.
Purpose
The purpose is to consistently perform all configuration, customization, development, formatting, and setup tasks necessary to implement the project requirements in D365. Also, limiting the risk of poor solution management, limiting rework and errors that occur due to restrictions in Dynamics architecture at no fault of the developer or admin.
Project Management
Between Sprint Start and End, the Solution Deployment Plan consists of three main areas: Assignment, Analysis and Design, and Configuration and Development. VSTS will provide the source of truth for versions, components and any insight to what item is being worked on. It will also provide information on what is in QA/Staging and what is being pushed to Production. There is a possibility for automation of this process in the future as complexity increases.
Note: It is best to manage this with a manual process when starting to ensure a complete understanding in the processes and the risks.
Assignment
Each client requirement is broken down into one or more tasks during the Sprint Planning Meeting. Then they are assigned to developers to complete the tasks during the two–week Sprint Cycle.
Analysis and Design
Details on the requirement will be determined during the Analysis and Design activity of the Sprint Cycle. Each development task may require a different approach to complete it. A senior technical lead will review the tasks and document in the task what components will be required for each one. This ensures avoiding dependency or overlap in efforts of development.
Ex. Task = View adjustments for users to group active and inactive contacts.
Comment entered could read – Modify: Contact Entity, Active View, Inactive View. Solution Used may be – Contact Management v1.0
Configuration and Development
The customizer will go to the assigned solution from VSTS and perform all work and general testing within that solution. Make sure to follow rules in working in a solution section below.
The developer will perform the required tasks in indicated development environment, select components by adding them to the indicated solution on the task.
If source control is used, these changes will not be checked back in until some basic testing of the changes has been performed and the developer is sure that the check-in process will not add any instability to the overall solution or the {regularly scheduled} build process.
The Solution Deployment Plan
From a general perspective, the solution deployment plan is as follows:
- Assignment
-
- User story and work item assigned in VSTS
- Analysis and Design
-
- Assess level of effort and appropriate release cadence.
-
- Determine conflicts or dependencies within components being configured as part of these work items.
- Configuration and Development
- Release Cadence, Sprint, and/or Patches are collected into unmanaged Solutions, each containing Solution Components.
- These solutions are created in D365s
- All configuration efforts are assigned to a solution
- The base for any solution is a v1.0, exported as an unmanaged solution and saved off in an archive location once completed.
- Release Cadence, Sprint, and/or Patches are collected into unmanaged Solutions, each containing Solution Components.
How this is carried out with efficiency is dependent on the relationship to task management for the project. Everything starts with VSTS or whatever task management tool is being used. The following outlines the process from a project perspective.
Step By Step
- Sprint Start
- Assignment
-
- User Story Created in VSTS
-
-
- Version created
-
-
- Tasks created and assigned
- Analysis and Design
-
- Functional Group and Components documented in VSTS
-
-
- Solution as part of this task is indicated on task
-
-
-
- Dependency on other solutions is indicated on task
-
-
- Solution(s) created
- Configuration and Development
-
- Document in description of each component and sub-component changes that were made (See Documentation)
-
- Testing and QA
- Sprint End
-
- Solution(s) Exported
-
- Solution(s) saved in archive
-
- Solution(s) import order determined by dependencies.
-
- Solution(s) imported to next location
- VSTS updated with result of solution import
For solution import process see Solution Export/Import.
Solution Export/Import
The following procedure identifies the typical steps used.
- Each solution that is part of that sprint/release is exported as “unmanaged”
- Saved in archive location (tbd)
- Imported to next environment.
-
- Errors
-
-
- Download error file – this is excel file with error message details helpful in troubleshooting
-
-
-
- Make fix in Dev
-
-
-
-
- Increment solution version each attempt
-
-
-
-
- Export unmanaged solution
-
-
-
-
- Save in archive location
-
-
Documentation
Technical manuals and documentation about development efforts on a Dynamics project are frequently expired by the time the system is live. These efforts feel wasted and do not align well with an agile methodology. The solution is to utilize description fields throughout Dynamics components.
All description fields will be populated with details about the purpose or decisions made during a project. Guidelines are as follows, but customizers and developers should use best discretion when creating descriptions.
- VSTS Item Number should be included.
- If description will appear as tooltip, like for fields, the description should be user friendly.
- Provide insight to another technician trying to troubleshoot any issue with this component.
- Workflows and processes should have detail about why logic is structured the way it is.
- Changes made should update the description field. No need for keeping historical. There will always be backups of data.
- Custom Code for plugins or other efforts on project should always include VSTS number in comments.
- Something is always better than nothing.
Solution Structure
In keeping with software lifecycle best practices, the naming of solutions must be intentional and transparent to all involved. Also, to improve production support and avoid ever changing documentation, the efforts within the project to configure or customize the system should be consumable by support engineers or customizers during their troubleshooting efforts.
When it comes to configuration and customization efforts performed during a project, there will be three types of Solutions seen within the system.
Base Solution
Each project will have a common Base Solution. This ensures that all efforts work from the same starting point.
To accommodate concurrent efforts and overlapping demands from the business, the CRM Dev Organization will contain the Base Solution. This portion of the Solution will include, the generic configuration Entities, Plug-ins, Security Roles and Core JavaScript libraries that are common amongst all lines of business.
Note: During analysis and design within each sprint the team will determine if a task is needed to update the Base Solution based on changes being made.
Sprint Solution
The Current Sprint Solution may be composed of the following pieces:
- Configurations
-
- Dashboards
-
- Entities
-
- Reports
-
- Roles
-
- Option Sets
- Processes
-
- Workflows
-
- BPF
- Code
-
- Plug-Ins
-
- Custom Workflow Activities
-
- Scripts/Script Files
-
- Web resources
-
- HTML Pages
-
- SDK Message Processing Steps
Patch Solution
Adding an entity to a solution then exporting the solution, includes the entity and all related assets as part of that export file for that solution. These assets include attributes, forms, views, relationships, and visualizations, and any other assets that are packaged with the entity. Exporting all objects means that customizers can unintentionally modify objects on the target deployment, or carry over unintended dependencies.
To address this, you can create and publish solution patches that contain subcomponents of entities rather than publishing the entire entity and all assets. The original solution and one or more related patches can be rolled up (merged) later into an updated version of the solution, which then can replace the original solution in the target Microsoft Dynamics 365 organization.
Dynamics 365 v8.0 and higher offer the ability to create patches to either managed or unmanaged solutions and include only changes to entities and related entity assets. Patches do not contain any non-customized system components or relationships that it is dependent upon because these components already exist in the deployed-to organization. At some point in the sprint cycle, roll up all the patches into a new solution version to replace the original solution that the patches were created from.
https://msdn.microsoft.com/en-us/library/mt593040.aspx
Solution Patch Example
The following table lists the details of a patching example. Note that in this example, the solution and patches are imported in numerical order and are additive, which is consistent with solution import in general.

The import process is as follows.
- The developer or customizer first imports the base solution (SolutionA 1.0) into the organization. The result is entityA with 6 fields in the organization.
- Next, the SolutionA patch 1.0.1.0 is imported. The organization now contains entityA with 6 fields (3 have been updated), plus entityB with 10 fields.
- Finally, SolutionA patch 1.0.2.0 is imported. The organization now contains entityA with 6 fields (3 updated), entityB with 10 fields, plus entityC with 10 fields.
Solution Layering Overview
With multiple lines of business setting requirements to be met by one System, it is crucial to keep the Solution Layering Process in mind. The Base Core Solution will be an Unmanaged Solution, and will be maintained in accordance with the process outlined by Microsoft. Please see the link below for details on that solution management.

Solution Naming Convention
Solutions will contain a structured name that will ensure sorting by name also sorts by most recent at the top. (ex. PILOT_Sprint3_Conf_1_0_1)
- Project Acronym
- Sprint Number – use “Patch” for patches or hot fix
- Functional group
-
- See Functional Groups for detail
- Version – entered when Solution created and appended upon export.
-
- See Versioning for detail
- Add when saving to Archive
-
- Solution Created Date (yyyymmdd)
-
- This is not needed in the Solution name, but in the zip file name when the solution is exported and archived.
Functional Groups
At a minimum within each organization there will be some version of these four solutions.
- Base (Base)
-
- Contains core components not part of the default Organization
- Shared by all lines of business
- This will not change frequently and will be monitored during each project to keep updated when User story calls for a global change.
- Configurations (Conf)
-
- Contains functional changes by a customizer within Dynamics.
-
-
- Components include entities, fields, forms, views, security, option sets, etc.
- Reports and dashboards can be put in here or split off into their own solution, depends on demand and cadence of sprint.
-
- Processes (Proc)
-
- Contains business process flows, workflows, and actions that are configured through the Dynamics interface.
- If custom workflow is already built efforts are completed in this solution.
- Code (Code)
-
- Contains any custom code efforts by developers. If the work cannot be done through Dynamics UI then it should be published and/or registered through this solution.
- This includes custom workflow steps, plugins, javascript, web resources, custom assemblies, custom reports built in SSRS etc.
Versioning
To manage Solution versioning, Major Version releases will be tracked differently than Minor Version releases. When using a ‘Source Control Process’ the GIT repository uses each check-in to track the Build Number and increment that number accordingly. However, when working with solutions in Dynamics, versioning will need to be up to the project team. Regardless, versioning should follow good application lifecycle management practices. (Modify to fit internal best practices)
Major Version changes are significant changes to the System, and may correspond to breaking changes in Interfaces. Major Version numbers will correspond to a full release to production.
Minor Version changes are externally visible. Minor Version changes will correspond to the beginning of each sprint or release cadence.
Service Version changes are bug fixes, or otherwise not externally visible and no chance of breaking interfaces.
Order Version given dependency of one solution on another within one sprint it is essential to keep the order of solution import correct.
[major].[minor].[service].[order]
Release Cadence (sample)
1.0.0 = Go-Live
1.0.1 = Next sprint post go-live feature fixes and net new
1.0.1.1 = Configuration Solution
1.0.1.2 = Dev changes
1.0.1.3 = Processes
VSTS user stories tied to Solution named “[project]_Sprint#” and version 1.0.1
Functional tasks tied to related Conf_1.0.1.1
Dev tasks tied to related Code_1.0.1.2
Process tasks tied to related Proc_1.0.1.3
Procedures
Working in a solution
- Publishing
-
- DO NOT PUBLISH ALL
- Select entity and click publish in navigation to publish only that entity.
- Adding components
-
- Only add what is needed for task. Do not add all sub-components.
- Do not add required components that are missing from the solution
- Creating Processes
-
- Components are added as needed when creating the process.
- Process is created through the solution so publisher prefix is appropriately added.
Conflict Resolution Rules
When two or more solutions define solution components differently, Microsoft Dynamics 365 resolves the conflict using two strategies, Merge and Top Wins. The following diagram illustrates the differences.

Merge
User interface components (command bar, ribbons, forms, and site map) are merged. This means that the solution components are re-calculated from the lowest level to the highest so that the organization’s unmanaged customizations are the last to be applied.
Top Wins
For all other solution components any conflict is calculated in favor of the customization that is applied last. For managed solutions this usually means that the last solution installed is applied. However, there is a special case when an update to a managed solution is installed.
From <https://msdn.microsoft.com/en-us/library/gg334576.aspx>
———Appendix———
The following sections outline advanced and highly controlled solution plans using source code repository tool like GIT or TFS.
SolutionPackager
The SolutionPackager tool can be used with any Source Control System. This tool is from the Microsoft Dynamics CRM SDK and is located within the BIN folder (the SDK can be downloaded from: https://www.microsoft.com/en-us/download/details.aspx?id=44567).
For our purposes, it will extract individual components from one of CRM Solution’s .zip files and break the Solution file into various component folders. This folder structure will match that of the Visual Studio Solution’s folder structure for submitting files to the Source Control System.
When the SolutionPackager tool extracts the component files and, if file contents are identical, it will not overwrite existing component files. The tool generates a Warning in the console window for the User, alerting him/her of any files that were not written, due to the read-only attributes. This enables the User to check out, from Source Control, the minimal set of files that are changing.
As is done with any other type of Source File, a Developer may submit the changed files back into Source Control after the extract operation has been completed. Once all the changes are saved into Source Control, SolutionPackager can pack those files into a CRM .zip, which is an unmanaged Solution file that can then be imported into CRM
See the following link for additional information.
https://msdn.microsoft.com/en-us/library/jj602987.aspx
Figure 3 provides an illustration of the SolutionPackager process detailed above.
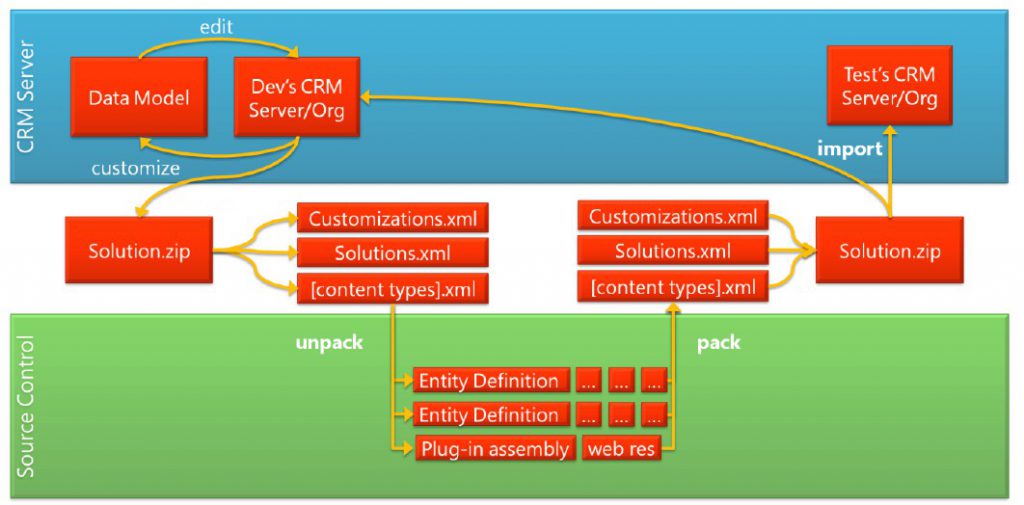
Solution control process (modify)
To Do: Replace manual processing of solutions with below and include current screenshots of Solution Packager and broken into folders containing its various Components, as seen in Figure 3.
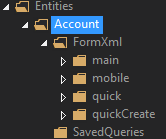
Note: Figure 3a is an expansion of folders displayed in Figure 3. “
Deployment Automation
When using source control to manage solutions and you are ready to check in, do the following steps.
Note: ORGANIZATION is not using source control for solutions as of April 2017, but may implement automation for solutions at a later date.
- Create new solution
- Export the unmanaged solution.
- Using the SolutionPackager tool, extract the solution into component files.
- From those extracted component files, add the necessary files to source control.
- Submit these changes to source control.
- Modify a solution
When using source control to manage solutions the following procedure identifies the typical steps used when modifying an existing solution.
- Modify a solution
- Synchronize or get the latest solution component file sources.
- Using the SolutionPackager tool, pack component files into an unmanaged solution .zip file.
- Import the unmanaged solution file into an organization.
- Customize and edit the solution as necessary.
- When you are ready to check the changes into source control, do the following.
-
- Export the unmanaged solution.
-
- Using the SolutionPackager tool, extract the exported solution into component files.
-
- Synchronize or get the latest sources from source control.
-
- Reconcile if any conflicts exist.
-
- Submit the changes to source control.
Steps 2 and 3 must be done before further customizations occur in the development organization. Within step 5, step b must be completed before step c.
Deployment Stages
Checked-in
Once checked in, changes will be included in the {regularly scheduled} build process and will be available in the test environment for the unit and functional test scripts to be performed on them.
Build
Regularly scheduled build process
Promote
The status a solution enters when a build is complete and ready for publishing to the next environment.
Publish
The process of packaging sprint changes into a solution and sent to the next environment.
Proposed Multi-Solution Approach
If development or configurations will encompass parallel efforts, the best course for development is a Multi-Solution Approach. This approach requires some form of deployment automation covered above. Multiple Dev environments will need to be provisioned. During Development, each Developer will work on the specific Organization (CRM) assigned to him/her. With multiple systems being built simultaneously, a central source is necessary. For our purposes, the master historical source will be a GIT repository that is also tied into VSTS.
More details needed to be determined when this approach is necessary.

