
If you frequently use Azure Logic Apps, Power Automate, or PowerApps, you are probably familiar with the abundance of connectors available. A connector is a proxy or a wrapper around an API that allows the underlying service to talk to different platforms. They provide a way for users to connect their accounts and leverage a set of pre-built actions and triggers to build apps and workflows. However, there may come a time where you want to call APIs, services, and systems that are not available as pre–built connectors. What do you do in this scenario? Read below to learn the steps in creating a custom connector.
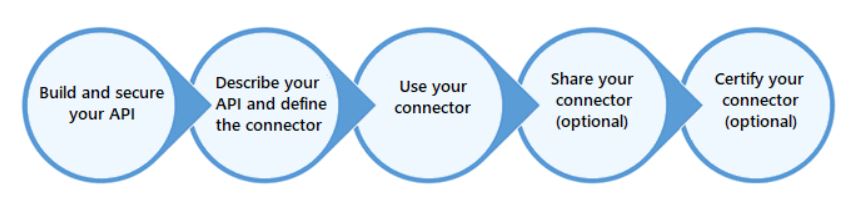
1. Build your API
A custom connector is a wrapper around REST API that allows Logic Apps, Power Automate, or PowerApps to communicate with the REST or SOAP API. These APIs can either be public or private, depending on public internet versus being visible only to your network. If you are planning on creating and managing public APIs, Azure products, such as Azure Functions, Azure Web Apps, and Azure API Apps, can be used. Microsoft offers on-premises data connectivity through an on-premises data gateway for private APIs. The gateways are supported by Logic Apps, Power Automate, and PowerApps.
2. Secure your API
For your APIs and connectors, using one of the following standard authentication methods is required:
– OAuth 2.0 for specific services, including Azure Active Directory, Dropbox, Github, and Salesforce
3. Describe the API and define the custom connector
The next step is to describe your API so that platforms, such as Logic Apps, Power Automate, or PowerApps, can properly communicate with it. OpenAPI and Postman collections use different formats and are language-agnostic, machine-readable documents that describe your API. You can accomplish this through one of three ways:
– An OpenAPI definition
– Create a custom connector from an OpenAPI definition
– OpenAPI documentation
– A Postman collection
– Create a custom connector from a Postman collection
– Postman documentation
– Start from scratch using the custom connector portal (Power Automate and PowerApps only)
– Create a custom connector from scratch
4. Use your connector in a Logic App, Power Automate, or PowerApps app
If you are familiar with Microsoft-managed connectors, then you already know how to use custom connectors. Once you create a connection to your API, you can use that connection to call any operations that you have exposed in your custom connector. The connectors created in Power Automate are available in PowerApps. Creators in PowerApps are available in Power Automate.
5. Share your connector
Connectors can be shared with multiple users in your organization. You can do this the same way you share other resources through Logic Apps, Power Automate, or PowerApps. To learn how to do this, you can view this document prepared by Microsoft.
6. Certify your connector
If you want your connector to be shared with all users of Logic Apps, Power Automate, and PowerApps, you must submit your connector for Microsoft certification. They will review your connector, check for technical and content compliance, and validate functionality.
Are you interested in seeing a tutorial? Microsoft provided a demonstration using the Cognitive Services Text Analytics API. They provided a connector for this API, but you can see an example of the custom connector lifecycle. If you have any questions about connectors in general, do not hesitate to reach out. We have a team of Solution Architects, Consultants, and Developers who are willing to help with your project!

