
- Edit Column
This blog was written by Power Learn Academy Apprentice and Business Central Functional Consultant Lamont Bloomfield.
Microsoft Dynamics 365 Business Central is a comprehensive and feature-rich solution that empowers businesses to streamline their financial operations. From managing purchases and sales to optimizing cash flow and tracking financial transactions, Business Central provides a robust platform for efficient financial management. One crucial aspect of financial control is the setup of pre-payments, which enables businesses to require payment before goods or services are delivered. By implementing pre-payment configurations, businesses can minimize the risk of non-payment, ensure smooth transactions, and maintain financial stability.
Following the step-by-step instructions and best practices provided in this blog post, you will gain valuable insights into configuring pre-payments, enhancing cash flow management, and making informed decisions to drive your business forward.
Understanding Pre-Payments in Business Central
Pre-payments in Microsoft Dynamics 365 Business Central are a fundamental component of financial management. They allow businesses to require payment from customers before delivering goods or services and ensure that vendors are paid in advance for purchases. This practice not only helps businesses maintain a healthy cash flow but also minimizes the risk of non-payment and improves financial stability. By implementing pre-payments, businesses can establish better control over their purchasing and sales processes, enhancing their overall financial performance.
Step 1: Assign Prepayment General Ledger Accounts
Before you can start setting up pre-payments in Business Central, it is crucial to ensure that your General Ledger accounts for prepayments are created in the Chart of Accounts. These accounts serve as the foundation for recording and tracking prepayment transactions accurately. Here’s how to assign prepayment accounts in Business Central:
Begin by accessing the General Posting Setup. You can do this by selecting the search icon in Business Central and entering “General Posting Setup.”
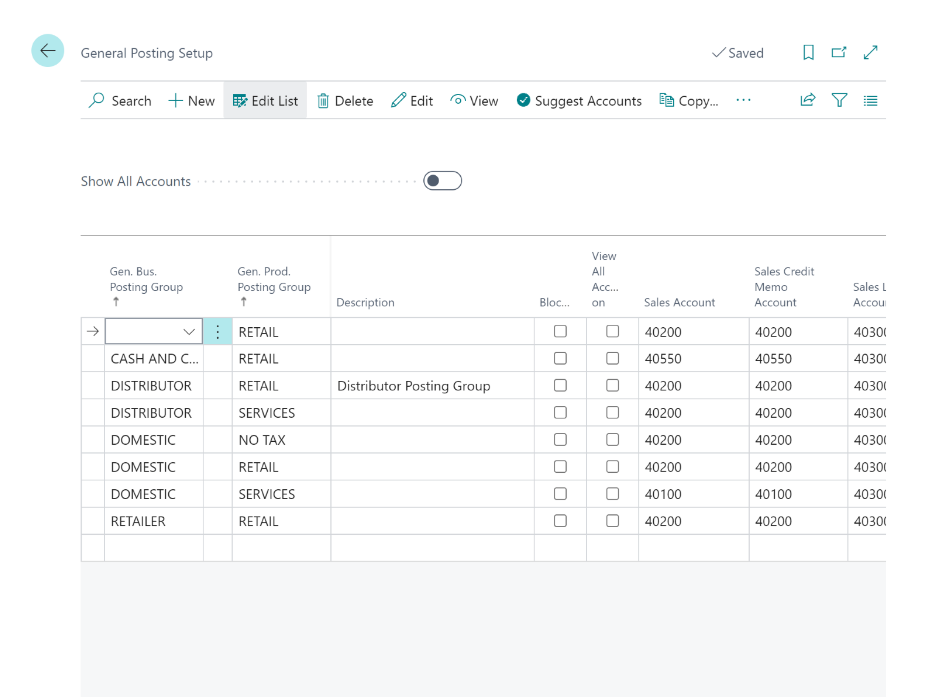
Click on the related link that appears and choose “Edit List” to display the Sales and Purchase Prepayments Account columns.
From each combination of Business Posting Group and General Product Posting Group codes, assign the appropriate prepayment General Ledger accounts that correspond to sales and purchase transactions.
Setting up the prepayment accounts correctly is essential as it ensures that prepayment transactions are accurately recorded, classified, and reflected in your financial statements.
Step 2: Set Up Number Series for Prepayment Documents
To streamline the documentation of prepayment transactions, it is essential to establish number series for prepayment invoices and credit memos. Number series help in organizing and tracking prepayment documents effectively. Here’s how to set up number series for prepayment documents in Business Central:
For sales prepayment documents, select the search icon in Business Central and enter “Sales & Receivables Setup.” Choose the related link that appears.

In the Number Series Fast Tab, select the appropriate number series code for Posted Prepayment Invoices and Posted Prepayment Credit Memos.
Similarly, for purchases prepayment documents, access the “Purchases & Payables Setup” in Business Central and follow the same steps to establish the corresponding number series.
Step 3: Set Up Prepayment Percentages for Items
Configuring prepayment percentages for specific items is crucial for accurate financial tracking and control. By assigning prepayment percentages to items, you can determine the proportion of the total amount that needs to be paid as a prepayment. Here’s how to set up prepayment percentages for items in Business Central:
Access the Items section in Business Central by selecting the search icon and entering “Items.” Choose the related link that appears.
Select the item for which you want to set up prepayment percentages. On the menu tab, choose “More Options” and then navigate to “Purchases / Sales” and click on “Prepayment Percentages.”
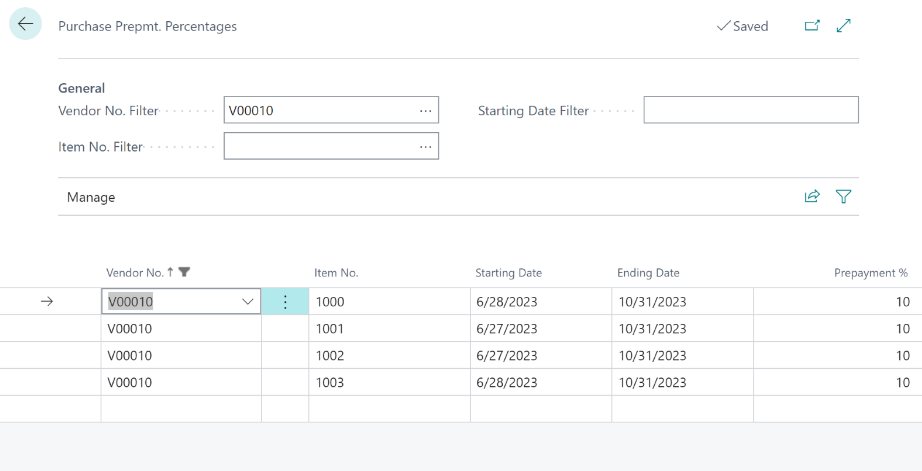
On the Purchase Prepayment Percentages page, select the Vendor No. for which the prepayment percentage should apply. Enter the desired prepayment percentage in the Prepayment % field. Fill in any other necessary details. Repeat the same steps for Sales Prepayment Percentages.
Close the Item window to save your changes.
Step 4: Set Up Prepayment Percentages for Vendors and Customers
In addition to setting up prepayment percentages for items, it is also essential to establish default prepayment percentages for vendors and customers. This allows for consistent and efficient prepayment handling across transactions. Here’s how to set up prepayment percentages for vendors and customers in Business Central:
Access the Vendors or Customers section in Business Central by selecting the search icon and entering “Vendors” or “Customers.” Choose the related link that appears.
Locate and edit the specific vendor or customer that requires a default prepayment percentage.
On the Payments Tab, click on “Show more” to reveal the Prepayment % field. Enter the appropriate default prepayment percentage for the vendor or customer.
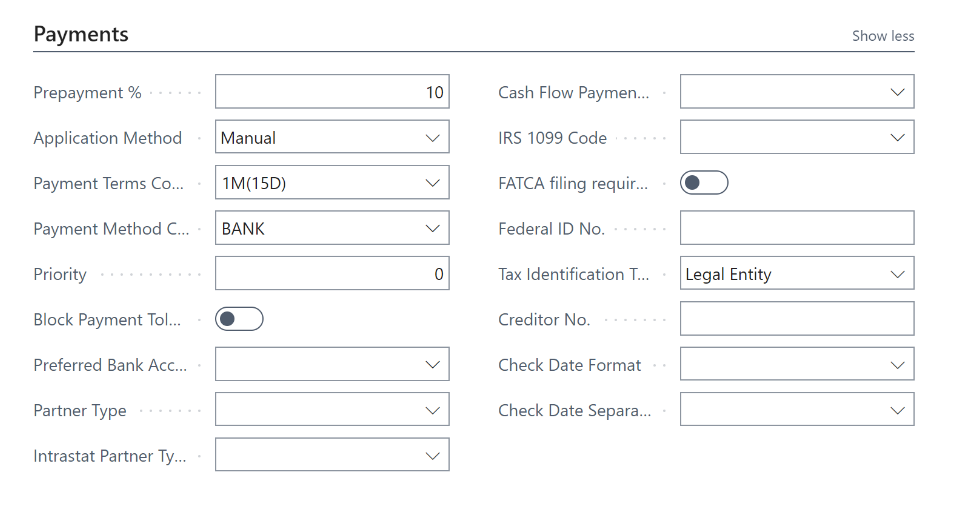
Close the Vendor or Customer Card window to save your changes.
Determining Pre-Payment Percentage Priority
In some cases, an order may have pre-payment percentages defined at different levels, such as on the sales/purchase header or the line item. It is essential to understand how the system determines which pre-payment percentage applies to each transaction. The priority order is followed:
- The system checks for a pre-payment percentage set for the item on the line and the customer/vendor associated with the order.
- If no specific percentage is found, the system looks for a pre-payment percentage set for the item on the line and the customer/vendor price group.
- If no match is found yet, the system checks for a pre-payment percentage set for the item across all customers/vendors.
- Finally, if no applicable percentages are found, the system resorts to the pre-payment percentage set on the sales or purchase header.
Understanding this priority order helps ensure that the correct pre-payment percentages are applied to each transaction, allowing for accurate financial tracking and control.
Conclusion
Setting up pre-payments in Microsoft Dynamics 365 Business Central is a crucial step in optimizing financial management and ensuring smooth transactions. By following the step-by-step instructions and best practices outlined in this guide, businesses can take control of their finances, minimize risk, and enhance overall operational efficiency. Mastering pre-payment setup empowers businesses to make informed decisions, manage cash flow effectively, and maintain financial stability.

